尋夢新聞LINE@每日推播熱門推薦文章,趣聞不漏接
作者丨SandyLoo
https://www.jianshu.com/p/b8a67c4acfb3
前言
當前互聯網行業的競爭已經是非常激烈了, 「功能驅動」的時代已經過去了, 現在更加注重軟件的細節, 以及用戶的體驗問題。 說到用戶體驗,就不得不提到用戶的操作行為。 在我們的軟件中,我們會到處進行埋點, 以便提取到我們想要的數據,進而分析用戶的行為習慣。 通過這些數據,我們也可以更好的分析出用戶的操作趨勢,從而在用戶體驗上把我們的app做的更好。
隨著公司業務的發展,數據的重要性日益體現出來。 數據埋點的全面性和準確性尤為重要。 只有拿到精準並詳細的數據, 後面的分析才有意義。 然後隨著業務的不斷變化, 埋點的動態性也越來越重要。為了解決這些問題, 很多公司都提出自己的解決方案, 各中解決方案中,大體分為以下三種:
1.代碼埋點
由開發人員在觸發事件的具體方法里,植入多行代碼把需要上傳的參數上報至服務端。
2.可視化埋點
根據標識來識別每一個事件, 針對指定的事件進行取參埋點。而事件的標識與參數信息都寫在配置表中,通過動態下發配置表來做到埋點統計。
3.無埋點
無埋點並不是不需要埋點,更準確的說應該是「全埋」, 前端的任意一個事件都被綁定一個標識,所有的事件都別記錄下來。 通過定期上傳記錄文件,配合文件解析,解析出來我們想要的數據, 並生成可視化報告供專業人員分析 , 因此做到「無埋點」統計。
由於考慮到「無埋點」的方案成本較高,並且後期解析也比較複雜,加上view_path的不確定性
具體可以參考:
https://neyoufan.github.io/2017/04/19/ios/網易HubbleData無埋點SDK在iOS端的設計與做到/
所以本文重點分享一個 可視化埋點 的簡單做到方式。
可視化埋點
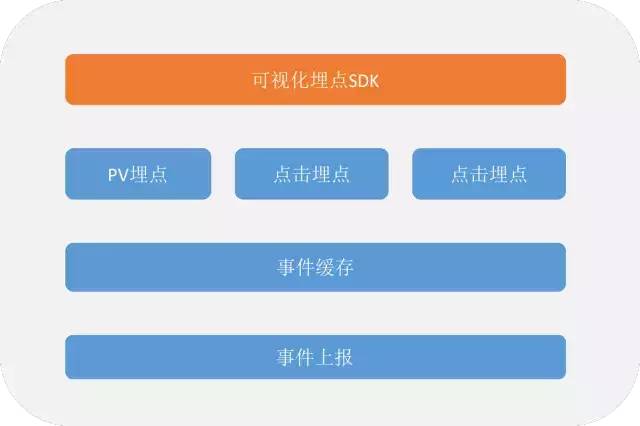
首先,可視化埋點並非完全拋棄了代碼埋點,而是在代碼埋點的上層封裝的一套邏輯來代替手工埋點,大體上架構如下圖:

不過要做到可視化埋點也有很多問題需要解決,比如事件唯一標識的確定,業務參數的獲取,有邏輯判斷的埋點配置項信息等等。接下來我會重點圍繞唯一標識以及業務參數獲取這兩個問題給出自己的一個解決方案。
唯一標識問題
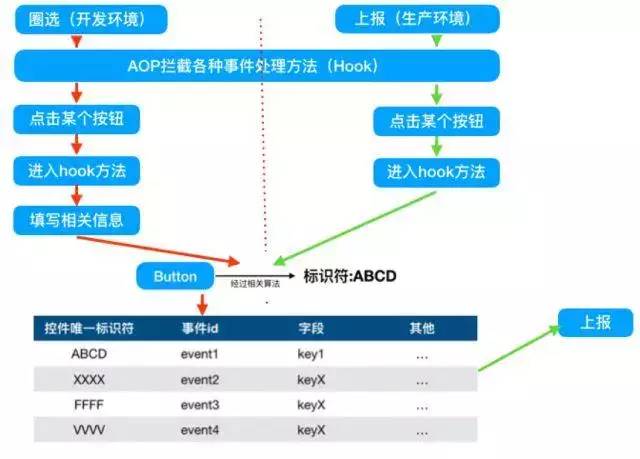
唯一標識的組成方式主要是又 target + action 來確定, 即任何一個事件都存在一個target與action。 在此引入AOP編程,AOP(Aspect-Oriented-Programming)即面向切面編程的思想,基於 Runtime 的 Method Swizzling能力,來 hook 相應的方法,從而在hook方法中進行統一的埋點處理。例如所有的按鈕被點擊時,都會觸發UIApplication的sendAction方法,我們hook這個方法,即可攔截所有按鈕的點擊事件。

這里主要分為兩個部分 :
事件的鎖定
事件的鎖定主要是靠 「事件唯一標識符」來鎖定,而事件的唯一標識是由我們寫入配置表中的。
埋點數據的上報。
埋點數據的數據又分為兩種類型: 固定數據與可變的業務數據, 而固定數據我們可以直接寫到配置表中, 通過唯一標識來獲取。而對於業務數據,我是這麼理解的: 數據是有持有者的, 例如我們Controller的一個屬性值, 又或者數據再Model的某一個層級。 這麼的話我們就可以通過KVC的的方式來遞歸獲取該屬性的值來取到業務數據, 代碼後面會有介紹。
整體代碼示例
由於iOS中的事件場景是多樣的, 在此我以UIControl, UITablview(collectionView與tableView基本相同), UITapGesture, UIViewController的PV統計 為例,介紹一下具體思路。
1.UIViewController PV統計
頁面的統計較為簡單,利用Method Swizzing hook 系統的viewDidLoad, 直接通過頁面名稱即可鎖定頁面的展示代碼如下:
@implementationUIViewController(Analysis)
+( void)load
{
staticdispatch_once_tonceToken;
dispatch_once(&onceToken, ^{
SEL originalDidLoadSelector = @selector(viewDidLoad);
SEL swizzingDidLoadSelector = @selector(user_viewDidLoad);
[MethodSwizzingTool swizzingForClass:[ selfclass] originalSel:originalDidLoadSelector swizzingSel:swizzingDidLoadSelector];
});
}
-( void)user_viewDidLoad
{
[ selfuser_viewDidLoad];
//從配置表中取參數的過程 1 固定參數 2 業務參數(此處參數被target持有)
NSString* identifier = [ NSStringstringWithFormat: @”%@”, [ selfclass]];
NSDictionary* dic = [[[DataContainer dataInstance].data objectForKey: @”PAGEPV”] objectForKey:identifier];
if(dic) {
NSString* pageid = dic[ @”userDefined”][ @”pageid”];
NSString* pagename = dic[ @”userDefined”][ @”pagename”];
NSDictionary* pagePara = dic[ @”pagePara”];
__block NSMutableDictionary* uploadDic = [ NSMutableDictionarydictionaryWithCapacity: 0];
[pagePara enumerateKeysAndObjectsUsingBlock:^( id_Nonnull key, id_Nonnull obj, BOOL* _Nonnull stop) {
idvalue = [CaptureTool captureVarforInstance: selfwithPara:obj];
if(value && key) {
[uploadDic setObject:value forKey:key];
}
}];
NSLog( @”n 事件唯一標識為:%@ n pageid === %@,n pagename === %@,n pagepara === %@ n”, [ selfclass], pageid, pagename, uploadDic);
}
}
2.UIControl 點擊統計。
主要通過hook sendAction:to:forEvent: 來做到, 其唯一標識符我們用 targetname/selector/tag來標記,具體代碼如下:
@implementationUIControl(Analysis)
+( void)load
{
staticdispatch_once_tonceToken;
dispatch_once(&onceToken, ^{
SEL originalSelector = @selector(sendAction:to:forEvent:);
SEL swizzingSelector = @selector(user_sendAction:to:forEvent:);
[MethodSwizzingTool swizzingForClass:[ selfclass] originalSel:originalSelector swizzingSel:swizzingSelector];
});
}
-( void)user_sendAction:(SEL)action to:( id)target forEvent:( UIEvent*)event
{
[ selfuser_sendAction:action to:target forEvent:event];
NSString* identifier = [ NSStringstringWithFormat: @”%@/%@/%ld”, [target class], NSStringFromSelector(action), self.tag];
NSDictionary* dic = [[[DataContainer dataInstance].data objectForKey: @”ACTION”] objectForKey:identifier];
if(dic) {
NSString* eventid = dic[ @”userDefined”][ @”eventid”];
NSString* targetname = dic[ @”userDefined”][ @”target”];
NSString* pageid = dic[ @”userDefined”][ @”pageid”];
NSString* pagename = dic[ @”userDefined”][ @”pagename”];
NSDictionary* pagePara = dic[ @”pagePara”];
__block NSMutableDictionary* uploadDic = [ NSMutableDictionarydictionaryWithCapacity: 0];
[pagePara enumerateKeysAndObjectsUsingBlock:^( id_Nonnull key, id_Nonnull obj, BOOL* _Nonnull stop) {
idvalue = [CaptureTool captureVarforInstance:target withPara:obj];
if(value && key) {
[uploadDic setObject:value forKey:key];
}
}];
NSLog( @” n 唯一標識符為 : %@, n event id === %@,n target === %@, n pageid === %@,n pagename === %@,n pagepara === %@ n”, identifier, eventid, targetname, pageid, pagename, uploadDic);
}
}
3.TableView (CollectionView) 的點擊統計。
tablview的唯一標識, 我們使用 delegate.class/tableview.class/tableview.tag的組合來唯一鎖定。 主要是通過hook setDelegate 方法, 在設置代理的時候再去交互 didSelect 方法來做到, 具體的原理是 具體代碼如下:
@implementationUITableView(Analysis)
+( void)load
{
staticdispatch_once_tonceToken;
dispatch_once(&onceToken, ^{
SEL originalAppearSelector = @selector(setDelegate:);
SEL swizzingAppearSelector = @selector(user_setDelegate:);
[MethodSwizzingTool swizzingForClass:[ selfclass] originalSel:originalAppearSelector swizzingSel:swizzingAppearSelector];
});
}
-( void)user_setDelegate:( id< UITableViewDelegate>)delegate
{
[ selfuser_setDelegate:delegate];
SEL sel = @selector(tableView:didSelectRowAtIndexPath:);
SEL sel_ = NSSelectorFromString([ NSStringstringWithFormat: @”%@/%@/%ld”, NSStringFromClass([delegate class]), NSStringFromClass([ selfclass]), self.tag]);
//因為 tableView:didSelectRowAtIndexPath:方法是optional的,所以沒有做到的時候直接return
if(![ selfisContainSel:sel inClass:[delegate class]]) {
return;
}
BOOLaddsuccess = class_addMethod([delegate class],
sel_,
method_getImplementation(class_getInstanceMethod([ selfclass], @selector(user_tableView:didSelectRowAtIndexPath:))),
nil);
if(addsuccess) {
Method selMethod = class_getInstanceMethod([delegate class], sel);
Method sel_Method = class_getInstanceMethod([delegate class], sel_);
method_exchangeImplementations(selMethod, sel_Method);
}
}
//判斷頁面是否做到了某個sel
– ( BOOL)isContainSel:(SEL)sel inClass:(Class) class{
unsignedintcount;
Method *methodList = class_copyMethodList( class,&count);
for( inti = 0; i < count; i++) {
Method method = methodList[i];
NSString*tempMethodString = [ NSStringstringWithUTF8String:sel_getName(method_getName(method))];
if([tempMethodString isEqualToString: NSStringFromSelector(sel)]) {
returnYES;
}
}
returnNO;
}
// 由於我們交換了方法, 所以在tableview的 didselected 被調用的時候, 實質調用的是以下方法:
-( void)user_tableView:( UITableView*)tableView didSelectRowAtIndexPath:( NSIndexPath*)indexPath
{
SEL sel = NSSelectorFromString([ NSStringstringWithFormat: @”%@/%@/%ld”, NSStringFromClass([ selfclass]), NSStringFromClass([tableView class]), tableView.tag]);
if([ selfrespondsToSelector:sel]) {
IMP imp = [ selfmethodForSelector:sel];
void(*func)( id, SEL, id, id) = ( void*)imp;
func( self, sel,tableView,indexPath);
}
NSString* identifier = [ NSStringstringWithFormat: @”%@/%@/%ld”, [ selfclass],[tableView class], tableView.tag];
NSDictionary* dic = [[[DataContainer dataInstance].data objectForKey: @”TABLEVIEW”] objectForKey:identifier];
if(dic) {
NSString* eventid = dic[ @”userDefined”][ @”eventid”];
NSString* targetname = dic[ @”userDefined”][ @”target”];
NSString* pageid = dic[ @”userDefined”][ @”pageid”];
NSString* pagename = dic[ @”userDefined”][ @”pagename”];
NSDictionary* pagePara = dic[ @”pagePara”];
UITableViewCell* cell = [tableView cellForRowAtIndexPath:indexPath];
__block NSMutableDictionary* uploadDic = [ NSMutableDictionarydictionaryWithCapacity: 0];
[pagePara enumerateKeysAndObjectsUsingBlock:^( id_Nonnull key, id_Nonnull obj, BOOL* _Nonnull stop) {
NSIntegercontainIn = [obj[ @”containIn”] integerValue];
idinstance = containIn == 0? self: cell;
idvalue = [CaptureTool captureVarforInstance:instance withPara:obj];
if(value && key) {
[uploadDic setObject:value forKey:key];
}
}];
NSLog( @”n event id === %@,n target === %@, n pageid === %@,n pagename === %@,n pagepara === %@ n”, eventid, targetname, pageid, pagename, uploadDic);
}
}
@end
4.gesture方式添加的的點擊統計。
gesture的事件,是通過 hook initWithTarget:action:方法來做到的, 事件的唯一標識依然是target.class/actionname來鎖定的, 代碼如下:
@implementationUIGestureRecognizer(Analysis)
+ ( void)load
{
staticdispatch_once_tonceToken;
dispatch_once(&onceToken, ^{
[MethodSwizzingTool swizzingForClass:[ selfclass] originalSel: @selector(initWithTarget:action:) swizzingSel: @selector(vi_initWithTarget:action:)];
});
}
– ( instancetype)vi_initWithTarget:( nullableid)target action:( nullableSEL)action
{
UIGestureRecognizer*selfGestureRecognizer = [ selfvi_initWithTarget:target action:action];
if(!target || !action) {
returnselfGestureRecognizer;
}
if([target isKindOfClass:[ UIScrollViewclass]]) {
returnselfGestureRecognizer;
}
Class class= [target class];
SEL originalSEL = action;
NSString* sel_name = [ NSStringstringWithFormat: @”%s/%@”, class_getName([target class]), NSStringFromSelector(action)];
SEL swizzledSEL = NSSelectorFromString(sel_name);
//給原對象添加一共名字為 「sel_name」的方法,並將方法的做到指向本類中的 responseUser_gesture:方法的做到
BOOLisAddMethod = class_addMethod( class,
swizzledSEL,
method_getImplementation(class_getInstanceMethod([ selfclass], @selector(responseUser_gesture:))),
nil);
if(isAddMethod) {
[MethodSwizzingTool swizzingForClass: classoriginalSel:originalSEL swizzingSel:swizzledSEL];
}
//將gesture的對應的sel存儲到 methodName屬性中,主要是方便 responseUser_gesture: 方法中取出來
self.methodName = NSStringFromSelector(action);
returnselfGestureRecognizer;
}
-( void)responseUser_gesture:( UIGestureRecognizer*)gesture
{
NSString* identifier = [ NSStringstringWithFormat: @”%s/%@”, class_getName([ selfclass]),gesture.methodName];
//調用原方法
SEL sel = NSSelectorFromString(identifier);
if([ selfrespondsToSelector:sel]) {
IMP imp = [ selfmethodForSelector:sel];
void(*func)( id, SEL, id) = ( void*)imp;
func( self, sel,gesture);
}
//處理業務,上報埋點
NSDictionary* dic = [[[DataContainer dataInstance].data objectForKey: @”GESTURE”] objectForKey:identifier];
if(dic) {
NSString* eventid = dic[ @”userDefined”][ @”eventid”];
NSString* targetname = dic[ @”userDefined”][ @”target”];
NSString* pageid = dic[ @”userDefined”][ @”pageid”];
NSString* pagename = dic[ @”userDefined”][ @”pagename”];
NSDictionary* pagePara = dic[ @”pagePara”];
__block NSMutableDictionary* uploadDic = [ NSMutableDictionarydictionaryWithCapacity: 0];
[pagePara enumerateKeysAndObjectsUsingBlock:^( id_Nonnull key, id_Nonnull obj, BOOL* _Nonnull stop) {
idvalue = [CaptureTool captureVarforInstance: selfwithPara:obj];
if(value && key) {
[uploadDic setObject:value forKey:key];
}
}];
NSLog( @”n event id === %@,n target === %@, n pageid === %@,n pagename === %@,n pagepara === %@ n”, eventid, targetname, pageid, pagename, uploadDic);
}
}
配置表結構
首先那, 配置表是一個json數據。 針對不同的場景 (UIControl , 頁面PV, Tabeview, Gesture)都做了區分, 用不同的key區別。 對於 “固定參數” , 我們之間寫到配置表中,而對於業務參數, 我們之間寫清楚參數在業務內的名字, 以及上傳時的 keyName, 參數的持有者。 通過Runtime + KVC來取值。 配置表可以是這個樣子:(僅供參考)
說明: json最外層有四個Key, 分別為 ACTION PAGEPV TABLEVIEW GESTURE, 分別對應 UIControl的點擊, 頁面PV, tableview cell點擊, Gesture 單擊事件的參數。 每個key對應的value為json格式,Json中的keys, 即為唯一標識符。 標識符下的json有兩個key : userDefine指的 固定數據, 即直接取值進行上報。 而pagePara為業務參數。 pagePara對應的value也是一個json, json的keys, 即上報的keys, value內的json包含三個參數: propertyName 為屬性名字, containIn 參數只有0 ,1 兩種情況, 其實這個參數主要是為tabview cell的點擊取參做區別的,因為點擊cell的時候, 上報的參數可能是被target持有,又或者是被cell本身持有 。 當containIn = 0的時候, 取參數時就從target中取值,= 1的時候就從cell中取值。 propertyPath 是一般備選項, 因為有時候從instace內遞歸取值的時候,可能會出現在不同的層級有相同的屬性名字, 此時 propertyPath就派上用處了。 例如有屬性 self.age 和 self.person.age , 其實如果需要self.person.age, 就把 propertyPath的值設為 person/age, 接著在取值的時候就會按照指定路徑進行取值。
{
“ACTION”: {
“ViewController/jumpSecond”: {
“userDefined”: {
“eventid”: “201803074|93”,
“target”: “”,
“pageid”: “234”,
“pagename”: “button點擊,跳轉至下一個頁面”
},
“pagePara”: {
“testKey9”: {
“propertyName”: “testPara”,
“propertyPath”: “”,
“containIn”: “0”
}
}
}
},
“PAGEPV”: {
“ViewController”: {
“userDefined”: {
“pageid”: “234”,
“pagename”: “XXX 頁面展示了”
},
“pagePara”: {
“testKey10”: {
“propertyName”: “testPara”,
“propertyPath”: “”,
“containIn”: “0”
}
}
}
},
“TABLEVIEW”: {
“ViewController/UITableView/0”:{
“userDefined”: {
“eventid”: “201803074|93”,
“target”: “”,
“pageid”: “234”,
“pagename”: “tableview 被點擊”
},
“pagePara”: {
“user_grade”: {
“propertyName”: “grade”,
“propertyPath”: “”,
“containIn”: “1”
}
}
}
},
“GESTURE”: {
“ViewController/controllerclicked:”:{
“userDefined”: {
“eventid”: “201803074|93”,
“target”: “”,
“pageid”: “123”,
“pagename”: “手勢響應”
},
“pagePara”: {
“testKey1”: {
“propertyName”: “testPara”,
“propertyPath”: “”,
“containIn”: “0”
}
}
}
}
}
取參方法
@implementationCaptureTool
+( id)captureVarforInstance:( id)instance varName:( NSString*)varName
{
idvalue = [instance valueForKey:varName];
unsignedintcount;
objc_property_t *properties = class_copyPropertyList([instance class], &count);
if(!value) {
NSMutableArray* varNameArray = [ NSMutableArrayarrayWithCapacity: 0];
for( inti = 0; i < count; i++) {
objc_property_t property = properties[i];
NSString* propertyAttributes = [ NSStringstringWithUTF8String:property_getAttributes(property)];
NSArray* splitPropertyAttributes = [propertyAttributes componentsSeparatedByString: @”””];
if(splitPropertyAttributes.count < 2) {
continue;
}
NSString* className = [splitPropertyAttributes objectAtIndex: 1];
Class cls = NSClassFromString(className);
NSBundle*bundle2 = [ NSBundlebundleForClass:cls];
if(bundle2 == [ NSBundlemainBundle]) {
// NSLog(@”自定義的類—– %@”, className);
constchar* name = property_getName(property);
NSString* varname = [[ NSStringalloc] initWithCString:name encoding: NSUTF8StringEncoding];
[varNameArray addObject:varname];
} else{
// NSLog(@”系統的類”);
}
}
for( NSString* name invarNameArray) {
idnewValue = [instance valueForKey:name];
if(newValue) {
value = [newValue valueForKey:varName];
if(value) {
returnvalue;
} else{
value = [[ selfclass] captureVarforInstance:newValue varName:varName];
}
}
}
}
returnvalue;
}
+( id)captureVarforInstance:( id)instance withPara:( NSDictionary*)para
{
NSString* properyName = para[ @”propertyName”];
NSString* propertyPath = para[ @”propertyPath”];
if(propertyPath.length > 0) {
NSArray* keysArray = [propertyPath componentsSeparatedByString: @”/”];
return[[ selfclass] captureVarforInstance:instance withKeys:keysArray];
}
return[[ selfclass] captureVarforInstance:instance varName:properyName];
}
+( id)captureVarforInstance:( id)instance withKeys:( NSArray*)keyArray
{
idresult = [instance valueForKey:keyArray[ 0]];
if(keyArray.count > 1&& result) {
inti = 1;
while(i < keyArray.count && result) {
result = [result valueForKey:keyArray[i]];
i++;
}
}
returnresult;
}
@end
結尾
以上是自己的一些想法與實踐, 感覺目前的無痕埋點方案都還是不是很成熟, 不同的公司會有不同的方案, 但是可能大部分還是用的代碼埋點的方式。 代碼埋點的侵入性,維護性成本比較大, 尤其是當埋點特別多的時候, 有時候自己幾個月前寫的埋點代碼,突然需要改,自己都要找半天才能找到。 並且代碼埋點很致命的一個問題是無法動態更新, 即每次修改埋點,必須重新上線, 有時候上線後產品經理突然跑過來問:為什麼埋點數據不太正常那, 此時你突然發現有一句埋點代碼寫錯了, 這個時候你要麼承認錯誤,承諾下次加上。要麼趕快緊急上線解決。 通過以上方式,可以做到埋點的動態追加。 配置表可以通過服務端下載, 每次下載後就存在本地, 如果配置表有更新,只需要重新更新配置表就可以解決 。 方案中可能很多細節還需要完善,例如selector方法中存在業務邏輯判斷,即一個標識符無法唯一的鎖定一個埋點。 這種情況目前用配置表解決的成本較大, 並且業務是靈活的不好控制。 所以以上方案也只是涵蓋了大部分場景, 並非所有場景都適用,具體大家可以根據業務情況來決定使用範圍。
最後, 大家如果有什麼建議,歡迎簡信給我。 我們一起來探討完善這個一個方案。
demo:
https://github.com/SandyLoo/iOS-AnalysisProject
長
按
關
註


